Add Floss Bookmark Accents
to Add Color to Fringe
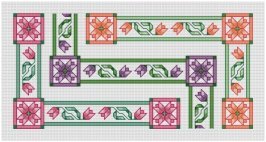
Add a nice colorful touch to your fringe using this technique for floss bookmark accents. Select one or more strands of embroidery floss using a color you've used in the design, as I did with my Garden Treasures Bookmarks, or spice it up with a contrasting color.
NOTE: This method is for projects that call for two sides to be joined, like bookmarks and Christmas ornaments.

Look closely at this picture and you'll see that these bookmark accents do not come from one side or the other. They blend in with the other strands of the fringe because they originate from between the two sides.
Despite the number of diagrams to follow, this is really quite easy. Do one bookmark in this manner, and you probably will not have to check back here for the next one.
In short, you will bring your floss up to the wrong side of your fabric, weave your floss in a crazy-eight pattern underneath existing stitches, then bring the floss back down through to the right side of the fabric.
This anchors the floss strands in place as you stitch the row of half stitches that joins the front and back pieces.
Here's the long version
Do this step once you've finished stitching both sides, but before you join them:
- Choose one of the sides to attach the floss (it doesn't matter, the result is the same).
- Decide how many strands of floss you'd like to use. Select an even number. For our Garden Treasures bookmarks, I used all six strands.
- Determine how frequently you'll insert these strands. For the Tulip bookmark, I inserted four, evenly-spaced floss accents on each end.
NOTE: From now on, I will describe this process as if you'll be using six strands, too.
Make bookmark accents
- Separate three strands of floss, and recombine them as usual.
- Thread your needle with all three strands, pulling them through your needle until the short tail is only about three inches long.
- Turn your fabric face down; you'll be working on the wrong side for most of this process.
 Step 4
 Step 5
 Step 6
 Step 7
 Step 8
 Step 9
- Determine the location of your first accent.
- At the last row of stitching, skip one empty hole, then bring your needle up at the next empty hole.
- Pull the floss through until the long end is about a half inch longer than the edge of your fabric.
- Following the diagram, thread your floss under a stitch in the first row.
- Thread it under the stitch directly above.
- Come back down and thread it in the opposite direction under the first stitch.
- Continue moving downward and push your needle through the original hole to the front of the fabric.
- Gently pull both ends of floss to take up the slack.
- Trim both ends to be about a half inch longer than your fabric.
- Repeat this process at each accent location.
 The back will look like this
 ... and the front will look like this
 Cross Section
Now that you have your floss accents "tacked" in place on each end, you can join the front of the piece to the back. Do this by placing half stitches around the perimeter of the piece, in the row immediately adjacent to the last row of cross stitches.
Click here for step-by-step instructions and diagrams on Joining Sides.
When you come to holes where the floss accents are located, lightly tug on the floss tails so they are straight. Hold them in place as you put your half stitch in the hole over these floss strands.
When you are finished, the top side should look like this.
 Cross Section After Joining the Two Sides
After joining sides, note the floss in the middle between the two sides of the "sandwich."
Next, remove the fabric rows to make fringe. Click here for instructions and diagrams on Making Fringe.
Last, gently comb through the fringe with your fingers to intermix the floss accents. Manipulate the individual strands to make sure you can see these accents on both sides.
If you haven't already, trim the fringe to your desired length.
Other Ways to Use Bookmark Accents
The above instructions give just one way to add floss accents to your projects. Try these:
- use fewer strands for a more subtle look
- use floss that is only slightly lighter/darker than your fabric color
- use metallic floss to add highlights to fringe
Have fun experimenting with bookmark accents!
Home › How to Make Fringe › Bookmark Accents
Blog
-
Fabric Mounts
Nov 25, 17 08:17 PM
I want to ditch my old split rail frames and stand. I have read about a new product called, Fabric Mounts. It is supposed to keep material taut and aligned -
Hoops are okay
Nov 25, 17 08:15 PM
I've tried them all . I prefer spring hoops but if my hands are weak I have a difficult time squeezing it. The tension is great if you like taut. I NEVER -
Why a hoop????
Nov 25, 17 08:14 PM
I have never used a hoop and have been cross-stitching for 15 years - only because I didn't think it appropriate. Suddenly I came across this article and -
Don't settle for "almost"
Apr 08, 17 01:16 AM
What do you do when you can't find the perfect cross stitch chart? It happens more than you'd think.
Even though we're no longer limited to the patterns we can find in magazines or at the local craft…