Cross Stitch Graph Paper
 Cross Stitch Graph Paper
Our easy-to-print cross stitch graph paper helps you create and customize your cross stitch designs. Sizes range from 6 to 32 count, and you can request others. Read more to learn why one size fits all.
Cross stitch graph paper consists of a grid with horizontal and vertical lines. A designer uses this paper, or the software equivalent, to create an image that can be stitched. Symbols are placed in each square to represent a stitch type and color.
By following the key or legend, this flat paper and ink pattern is transformed, by you, into a beautiful, three-dimensional design stitched with floss on fabric.
But, have you ever
- looked for a design with a particular person or purpose in mind, but just couldn't find "it"
- picked up a pattern thinking, "This would be perfect, if only . . ."
- needed to customize a cross stitch gift with names, dates or special verses.
- wanted to change specific elements in a design to make the piece more personal and meaningful?
Then it's time to learn about cross stitch graph paper!
Already an expert? Scroll to the bottom of this page to find cross stitch graph paper in counts ranging from 6ct to 32ct plus plain graph paper (with no bold lines). If you have another size, just put in a request and we will add it.
Which cross stitch graph paper should you use?
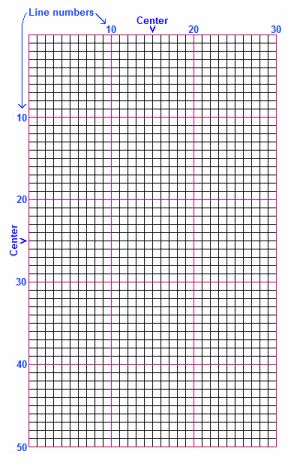
The first thing to know is that most cross stitchers, and certainly
all commercial designers, create their charts using a standard 10-square
grid. This means that you will see a bold line, every 10 squares, both
vertically and horizontally.
These bold lines are there to make it easy for you to calculate the size of a design. At a glance you can count by 10s and quickly see how many stitches there are in length and width. This is the first step in determining how large your design will be on various counts of fabric.
(Eliminate calculations altogether by using our handy Stitch Count Table.)
If you are trying to decide between different fabric counts, it will be easier to make these calculations by designing on a 10-count grid.
If you are altering a cross stitch pattern designed by another, you should use the same 10-square grid that was used for the original design.
 See how easy it is to count by 10s and quickly determine the length and width of a design?
When should my graph paper match my fabric count?
Convenience
If you know you'll be using a specific fabric count, and you don't anticipate using the pattern again on different fabric, you can choose to have your graph paper match your fabric count.
Doing so eliminates the need for calculating the final design size. For example, if your fabric is 14-count, and your graph paper is 14 count, each section (divided by bold lines) on your graph paper equals one inch on your fabric.
Visualization
While designing, I often must visualize just how much detail I can add in the space I have available. I choose cross stitch graph paper that matches my fabric count and draw an outline equal to the size I'll have to work with. Then, as I begin to draw my design, it helps me imagine how the finished piece will look, how the design elements fit in the available space, and how many details I can include.
Here's an example: I want to stitch a design to fit in the 3" x 5" window of a greeting card. My design can't be larger than 3 blocks by 5 blocks.
- For 9 count graph paper (and fabric), I draw a rectangle in these measurements:
3 inches x 9 count = 27 stitches wide and 5 inches x 9 count = 45 stitches high
I see that I can't create my design with enough details, using so few stitches, so
- On 14 count graph paper (and fabric), I try again:
3 inches x 14 count = 42 stitches wide and 5 inches x 14 count = 70 stitches high
I continue until I find the fabric count that gives me enough stitches to create my design. However, when it comes to creating the cross stitch pattern for publication, I'll return to using the 10-square grid.
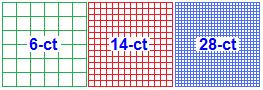 Comparison of 3 Stitch Counts
You can see by this comparison that you can work more details into the same one-inch square by using
fabric with a higher stitch count.
Should my graph paper be printed to scale?
Look at the comparison above. It's easy to see that 6-count graph paper, printed so that the space between each bold line equals an inch, results in individual squares that are large enough to work with.
Now, say you are using 32-count graph paper. Imagine squeezing 32 little squares in the space of an inch on your ruler. There would be barely enough room to put a pencil dot inside each one, much less draw symbols in it.
Remember, whether an individual square on your graph paper is the size of a postage stamp or the size of a wall, each square still represents only one stitch.
You can think about it this way: When you enlarge a cross stitch pattern on a copier to make it easier to see, it doesn't enlarge the size of stitches on your fabric. It's the same concept here.
Printing your cross stitch graph paper
Click on one of the links below for the count size of cross stitch graph paper that you want to print. On the higher stitch counts, you may need to print several sheets and tape them together. A new window will open so you can continue browsing here.
Click here for a PDF to print 6-count Graph Paper
Click here for a PDF to print 9-count Graph Paper
Click here for a PDF to print 10-count Graph Paper
Click here for a PDF to print 11-count Graph Paper
Click here for a PDF to print 14-count Graph Paper
Click here for a PDF to print 16-count Graph Paper
Click here for a PDF to print 18-count Graph Paper
Click here for a PDF to print 19-count Graph Paper
Click here for a PDF to print 20-count Graph Paper
Click here for a PDF to print 22-count Graph Paper
Click here for a PDF to print 25-count Graph Paper
Click here for a PDF to print 27-count Graph Paper
Click here for a PDF to print 28-count Graph Paper
Click here for a PDF to print 32-count Graph Paper
Click here for a PDF to print generic Graph Paper
If you want to work on plain cross stitch graph paper (with all the little squares but no bold lines representing the fabric count) print the Generic Graph Paper.
If you need to personalize your cross stitch project, see our collection of free alphabets and review our tips and techniques in Alphabet 123s. Be sure to see our free cross stitch charts page.
- Home ››
- Graph Paper
- Home ››
- Free Charts ››
- Borders ››
- Graph Paper
Home › Cross Stitch Graph Paper
Blog
-
Fabric Mounts
Nov 25, 17 08:17 PM
I want to ditch my old split rail frames and stand. I have read about a new product called, Fabric Mounts. It is supposed to keep material taut and aligned -
Hoops are okay
Nov 25, 17 08:15 PM
I've tried them all . I prefer spring hoops but if my hands are weak I have a difficult time squeezing it. The tension is great if you like taut. I NEVER -
Why a hoop????
Nov 25, 17 08:14 PM
I have never used a hoop and have been cross-stitching for 15 years - only because I didn't think it appropriate. Suddenly I came across this article and -
Don't settle for "almost"
Apr 08, 17 01:16 AM
What do you do when you can't find the perfect cross stitch chart? It happens more than you'd think.
Even though we're no longer limited to the patterns we can find in magazines or at the local craft…