Metallic Floss Tips
5 Tips for Stunning Results
Specialty floss can produce wonderful effects in cross stitch. Here a 5 Metallic Floss Tips to reduce the challenges and make the results even more stunning!
The most common floss used in cross stitch is made up of 6 single strands loosely twisted together and packaged in skeins. We cut the floss in certain lengths, separate the strands, then recombine the number called for in the cross stitch chart strand count.
In the past few years, though, companies like DMC and Kreinik have developed a number of specialty flosses. Initially, only blending filaments and some basic metallic flosses were offered. Now, it seems that every time I visit my favorite craft stores, new colors and "effects" have been added.
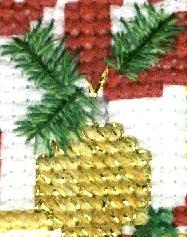
Click to see all of the other Christmas Ornaments in this series using specialty floss accents.
While the effect of these flosses can be quite striking, here are some things to consider.
- They are quite expensive, compared to standard cotton floss. One skein of DMC 6-strand cotton floss is significantly less expensive than a skein of the same brand of specialty floss.
- They can be a challenge to work with. I choose to use them sparingly.
- A design stitched entirely with these flosses can overwhelm the eye, and uniqueness suffers. However, used in just the right spots, they can add another dimension to your stitched piece.
Since Christmas is the perfect holiday for adding a little extra sparkle to your work, these 5 Tips will help you do just that.
5 Tips for Better Results with Metallic Floss
- Use Shorter Strands
Cut your floss into shorter strands. Specialty flosses break, separate and shred more easily with prolonged stitching. I've found that it will do so long before I'm able to use the full 18 inches typical of cotton floss (testing both the thread and my patience!). I stick with 12-inch or shorter strands instead. - Eliminate the Sewing Method
Do not use the sewing method with specialty floss. Using the push-pull method will lesson wear and tear. - Stitch on Top
Charts sometimes call for a blended needle. For example, it may instruct you to use 2 strands of cotton floss and 1 strand of specialty floss. Instead of using the cotton floss and the specialty floss threaded together onto one needle, do these stitches in two steps. First, stitch the applicable area with the cotton floss. Then, - Use a Larger Needle
Switch to a slightly larger needle. This makes a bigger hole for this more fragile floss to slip through. Because there is less friction as the floss passes through the hole, it will separate and break less often. - Thread the Needle Differently Use the following method for threading your needle. Cut floss to 24 inches.
Stitching on top instead of combining the flosses (see Tip 3 above) sometimes eliminates the need for full cross stitches in metallic floss. Because it lays on top of cotton stitches, a half stitch may be all that is needed to give you the right sparkle. Just be sure the half stitch goes in the same direction as the top diagonal you are stitching over.
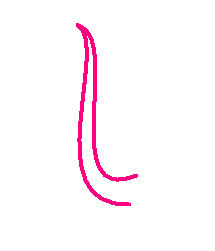 Cut your strand of floss 24 inches, fold it in half and crease.
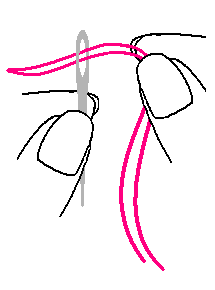 Thread an inch or two of the folded end through the eye of your needle...
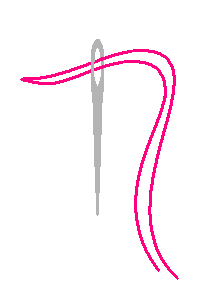 ...it forms a loop.
 Grasp the two ends of the floss, bring them up and thread them through the loop.
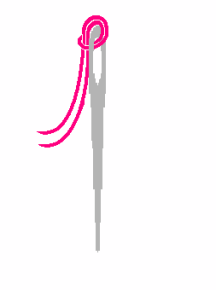 Gently pull the floss taut, so the floss is anchored at the eye of the needle.
Now you can begin stitching in the same manner as you would with standard cotton floss. Click to learn how to bury the ends of your floss or to how to make a waste knot. If the floss begins to separate and shred, don't continue stitching. Simply bury your thread and start with a new strand of floss
Using these tips, you'll have wonderful results with specialty flosses.
What about waxing your floss?
I have seen recommendations to use wax on floss to help it glide through your fabric. Because I have been successful with the techniques above, I have not needed to use wax. I am also reluctant to put any substance on the floss that may leave residue on my fabric, seen or unseen.
Often residue takes some time to become visible. That's because even invisible residue may collect dirt and dust.
However, I know that other stitchers do. My sister has white candles around her house and occasionally runs her floss over these while stitching. Still, since I haven't tried it myself, I am reluctant to recommend it.
If you do decide to try it, experiment on a scrap of the same fabric you are using before stitching on a piece that you've been working on. It would be a shame to risk ruining a project that you've invested time in.
If you have additional tips on using metallic floss, or have used wax on floss, share your experience with us.
Home › How to Cross Stitch › Metallic Floss
Blog
-
Fabric Mounts
Nov 25, 17 08:17 PM
I want to ditch my old split rail frames and stand. I have read about a new product called, Fabric Mounts. It is supposed to keep material taut and aligned -
Hoops are okay
Nov 25, 17 08:15 PM
I've tried them all . I prefer spring hoops but if my hands are weak I have a difficult time squeezing it. The tension is great if you like taut. I NEVER -
Why a hoop????
Nov 25, 17 08:14 PM
I have never used a hoop and have been cross-stitching for 15 years - only because I didn't think it appropriate. Suddenly I came across this article and -
Don't settle for "almost"
Apr 08, 17 01:16 AM
What do you do when you can't find the perfect cross stitch chart? It happens more than you'd think.
Even though we're no longer limited to the patterns we can find in magazines or at the local craft…