Using Loop Start to Secure Thread
Loop Start is another way to secure your thread when starting to stitch. Though you can bury the thread or use a waste knot in other circumstances, this technique is especially useful when making confetti stitches.
"Confetti stitch" is a common name for single stitch on a sea of otherwise blank fabric. They might be used to depict stars in the sky, individual snowflakes falling, and so on. They have acquired this name because they resemble confetti sprinkled on a surface--a piece here, a piece there.
It is not uncommon for a pattern to call for individual stitches of differing colors, but the confetti stitch is a single cross stitch, with no other stitches touching them, of any color.
Click for the "Let it Snow" Christmas Ornament.
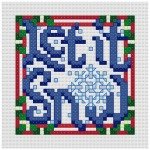 An example of confetti stitches in "Let it Snow."
The stitch is simple enough. But cross stitchers everywhere know that we risk public scorn and private humiliation if we're ever caught tying a knot. So, without other stitches close or adjoining, how do we bury the floss ends?
I was dismayed to read in forums that many stitchers avoid patterns that call for confetti stitches because it presents just this challenge.
Don't avoid! Loop start instead!
Use the Loop Start to easily secure these individual stitches. The only caveat is that it works only when using an even number of strands. The diagram below assumes your chart calls for two strands.
Step 1
Separate a single strand of floss, twice as long as you normally use (If your chart calls for four strands, use two, and so on). Fold the floss in half, evenly.
Align the two ends, then thread both through the eye of your needle, just as though your were threading only one. Pull the two ends through the eye a couple of inches. The folded end is the long end.
Step 2
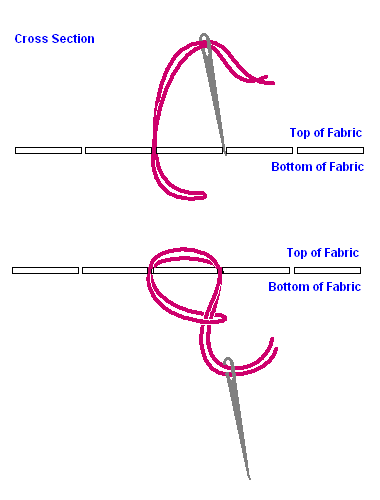
From the back (or bottom) of the fabric, push your needle up as you begin to make the first diagonal of your cross stitch. Leave a couple of inches of the folded floss end hanging in the back.
Step 3
Bring your needle down through the front (or top) of the fabric in order to complete your first diagonal. Don't pull it taut yet.
Step 4
On the back (or bottom), thread your needle through the hanging loop.
Step 5
Pull floss taut.
Step 6
On the front, you can see that this completes your first diagonal, while it pulls the loop flat against the back of the fabric.
Step 7
As you normally would, bring your needle up from the back to begin the second diagonal of your cross stitch. On the back, you can see the typical vertical stitch.
Step 8
On the front, push your needle down diagonally to complete your cross stitch.
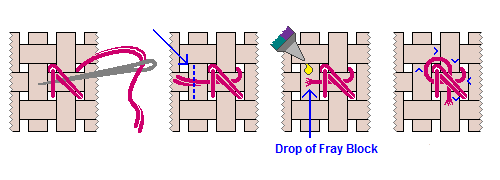
Bury the ends to finish your confetti stitch
Turn your fabric over and thread the needle horizontally underneath the loop and the vertical stitch.
If you are stitching something that will not be laundered or handled, clip the end of the floss. Apply a dot of Fray Block to the floss end to discourage raveling.
If a project will be handled or laundered, I take this extra step. Continue to loop your floss around and thread it under the stitches vertically. Clip the floss and Fray Block it there.
This nifty little technique can be used to start all of your stitches that call for an even number of floss strands.
I don't remember how I learned this, but I am working on how to adapt the Loop Start for use with any number of floss strands. If anyone else knows of a way to do this, contact us and we'll publish it.
Home › How to Cross Stitch › Loop Start
Blog
-
Fabric Mounts
Nov 25, 17 08:17 PM
I want to ditch my old split rail frames and stand. I have read about a new product called, Fabric Mounts. It is supposed to keep material taut and aligned -
Hoops are okay
Nov 25, 17 08:15 PM
I've tried them all . I prefer spring hoops but if my hands are weak I have a difficult time squeezing it. The tension is great if you like taut. I NEVER -
Why a hoop????
Nov 25, 17 08:14 PM
I have never used a hoop and have been cross-stitching for 15 years - only because I didn't think it appropriate. Suddenly I came across this article and -
Don't settle for "almost"
Apr 08, 17 01:16 AM
What do you do when you can't find the perfect cross stitch chart? It happens more than you'd think.
Even though we're no longer limited to the patterns we can find in magazines or at the local craft…