Pin Stitch Tutorial for Cross Stitch
Our Pin Stitch Tutorials give you another valuable technique to add to your cross stitch arsenal. It is a way of securing the end of your floss by making several tiny, barely-visible stitches tucked underneath a cross stitch.
There are several instances when this stitch can be used effectively:
- there is no place to bury the thread at the beginning of a stitch
- there is no place to bury the thread at the end of a stitch
- the frame you are using makes it difficult to access the back of your fabric
- both the front and the back of your finished cross stitch will be visible
- you have frequent floss color changes
- you want your finished cross stitch, overall, to have a neater and more finished appearance
Cross stitchers always look for ways to improve both the quality of our stitching, and the quality of our stitching experience. Just like some stitchers avoid patterns that use multiple French Knots (if this is you, click here for my French Knot Tutorial), others avoid patterns that use confetti stitches.
A confetti stitch is the name given to a single cross stitch, most often surrounded by blank fabric. Examples are snowflakes falling or the stars dotting the sky. The obvious challenge is that there are no surrounding stitches to bury the floss ends.
Our Pin Stitch Tutorials provide you with an easy solution so that you no longer have to avoid those designs.
Pin Stitch Variations
For many of the stitches you use when cross stitching, there is only one specific way to do them. For example, everybody does a Daisy Stitch, a Backstitch, a Straight Stitch the same way. But if you look online for Pin Stitch Tutorials, you'll soon discover that there seems to be several ways to perform this stitch.
So which one is the right way? Consider the following factors:
- fabric type
- fabric count
- number of floss strands
- whether you need to work on the front of the fabric for all Pin Stitch steps
- will your cross stitch piece be under stress (worn and/or laundered as opposed to being framed)
The bottom line is that the right Pin Stitch is the one that works for you, in your situation. Obviously, the right technique for today's project might not be the right choice for your next one.
This stitch can be easily done on Aida cloth. It can also be done on any evenweave fabric, such as linen, as long as you are stitching over two threads. I have not found a way to do it on evenweave when you are stitching over a single thread.
Once you understand the concept behind this stitch, you will be able to confidently adapt it to fit your circumstances.
Straight Pin Stitch Tutorial for Aida cloth
Making this barely-visible stitch on Aida depends on making sure it follows the direction of the threads in the fabric. So, it's crucial that you take a closer look at how the fabric is constructed.
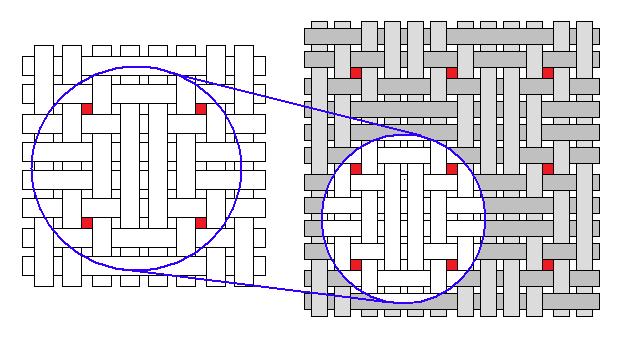
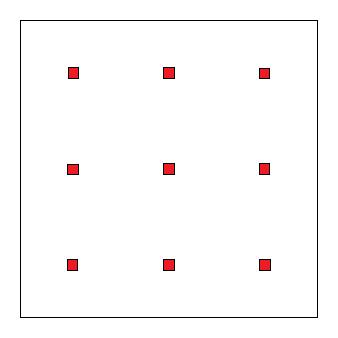 1. Aida - at a glance
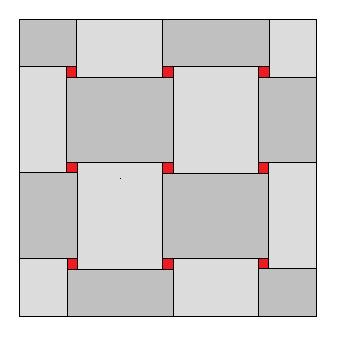 2. Aida - a closer look
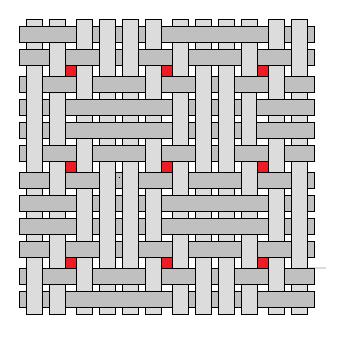 3. Aida - magnified
These three diagrams illustrate the make-up of Aida cloth.
- When you first glance at Aida cloth, you primarily notice the holes (shown in red) that you use when making your cross stitches.
- Look a little closer at that same cloth, and now you see that there is a specific "weave" to the fabric. You can tell that the threads go over and under alternately.
- Look at that same area under your magnifying device. Every "square," between the holes, is made up of four threads. Of those four threads, the two middle threads are woven over and under the four perpendicular threads. These are the the threads that you will use when making a Pin Stitch.
The diagrams for the following Pin Stitch Tutorial will be shown using this square of the Aida cloth.
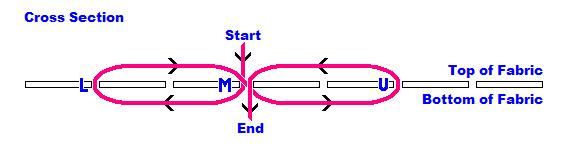
Straight Pin Stitch Tutorial
As mentioned, your stitches must follow the direction of the two inner threads. For the how-to diagrams below, I use the vertical threads.
Make this stitch once, and you'll find it very easy to adapt it when your threads are horizontal.
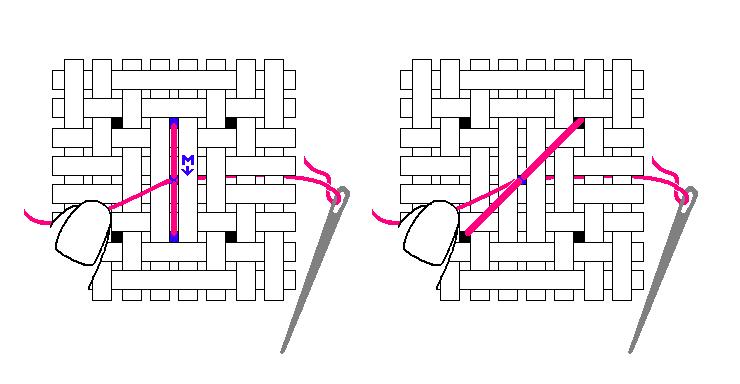
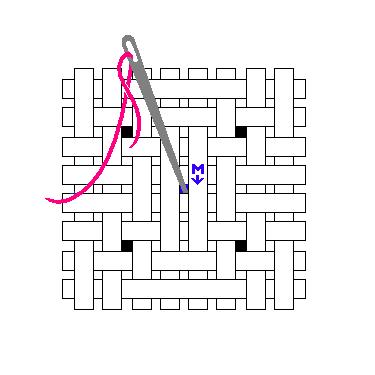
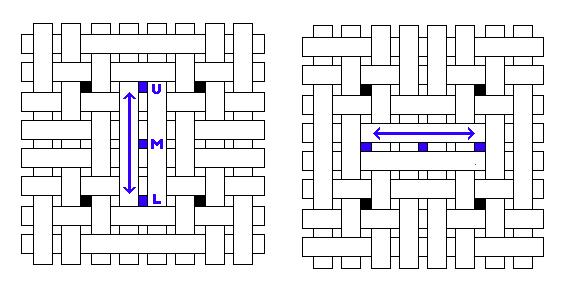 U = Upper Hole, M = Middle Hole, L = Lower Hole. The blue arrows highlight the direction of the two innermost threads.
I know it looks like a lot of steps. But because you are working in between the smallest threads of the fabric, I wanted to be absolutely certain that you could see exactly where to place your stitches. Don't be concerned - practice it once or twice, and you'll easily remember how to do it time after time.
These Pin Stitch Tutorials show you how to do your stitches entirely from the front of the fabric.
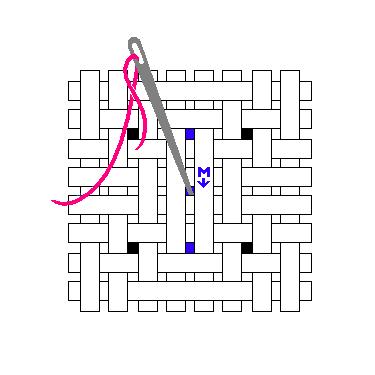 Step 1: Push your threaded needle down through the middle hole, front to back
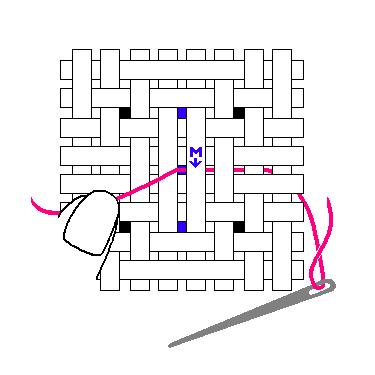 Step 2: Holding onto about a 1/2 inch of the floss end, continue pulling your needle completely through to the back.
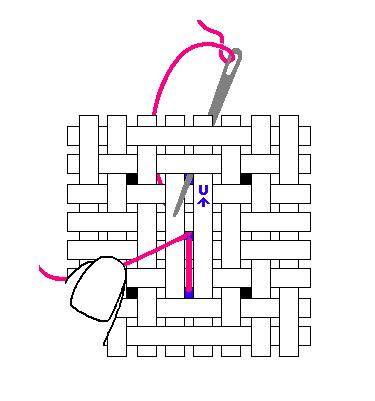
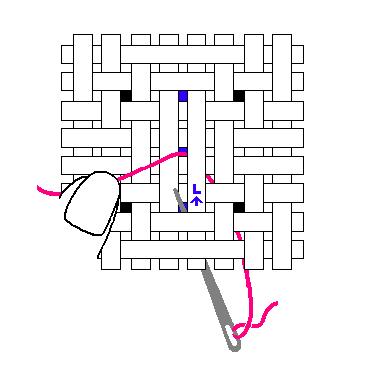 Step 3: Bring your needle up through the lower hole, back to front.
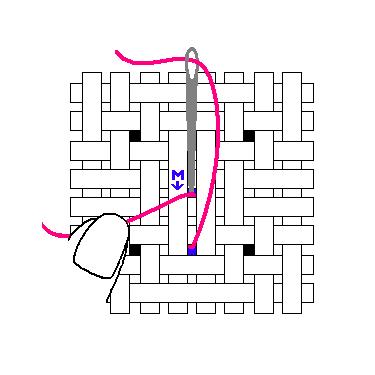 Step 4: Maneuver your needle back down through the middle hole again, front to back. As you pull the floss firmly through, the strands almost disappear between the vertical Aida threads.
DON'T STOP HERE! You might find that several Pin Stitch Tutorials stop at this point. From Step 4, they skip to Step 7. They only instruct you to make this single tiny stitch, then proceed to making a cross stitch.
Now, no one loves finding great techniques to speed up stitching more than I do. But I do not recommend this. While it make be sufficient for framed, under glass, wall decor, it is not for cross stitch that may be under stress.
It makes far more sense, and it's certainly easy enough, to make a secure and complete stitch every single time.
 Step 5: Bring needle up through the upper hole, back to front.
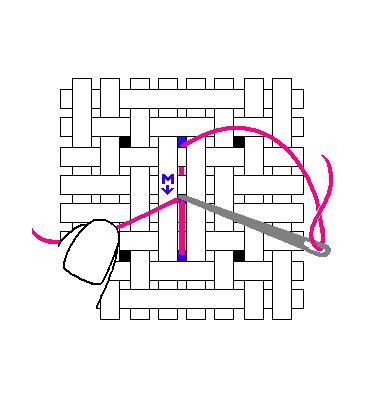 Step 6: Thread the needle back down through the middle hole again, front to back, and pull the floss through firmly.
 NOTE: On your fabric, you should see both stitches almost disappear between the two vertical Aida threads. You're nearly finished.
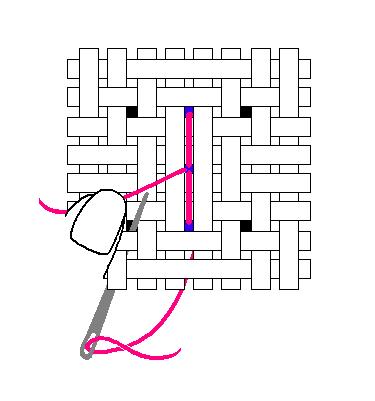 Step 7: Start making a regular cross stitch, bringing your needle up in the corner, back to front. I start mine in the lower left hole, but you can start yours in whichever corner you wish.
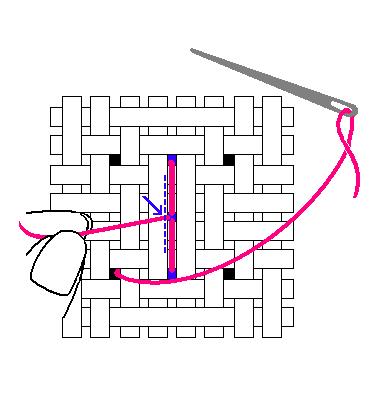 Step 8: Pull the tail of the floss that you have been holding taut, and carefully clip it close to the fabric (as shown by the blue arrow).
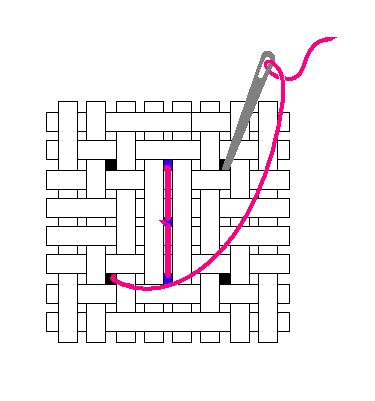 Step 9: Push your needle down, from front to back, to complete the first diagonal of your cross stitch.
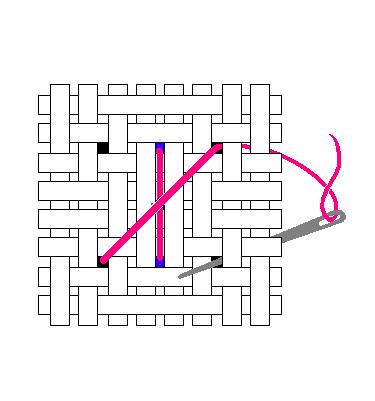 Step 10: Bring your needle up, back to front, to start the second diagonal of your cross stitch.
 Step 11: Push your needle down, front to back, into the final corner of your cross stitch.
 Your Pin Stitch is complete!
Note that, for purposes of instruction, I have made the underlying stitches VERY obvious.
On Aida cloth, these strands should lay down in between the threads of your fabric. This is the purpose of first determining the direction of the threads woven into your fabric, as shown above.
Once you've completed a cross stitch in the same square, you should not be able to see the Pin Stitch.
If it is visible, you may want to try the Angled Pin Stitch shown below.
Angled Pin Stitch Tutorial
This is a really slick method. The Straight Pin Stitch Tutorial involved constructing a Pin Stitch, followed by making a cross stitch over the top. In this Angled Pin Stitch Tutorial, the Pin Stitch actually becomes part of the cross stitch. A nice benefit is that the it doesn't add any additional thickness to the finished cross stitch.
For this variation, the direction of the threads in your Aida cloth does not matter. You just need to be able to part the inner threads to find the center of the square.
 Step 1: Push your threaded needle down through the middle hole, front to back.
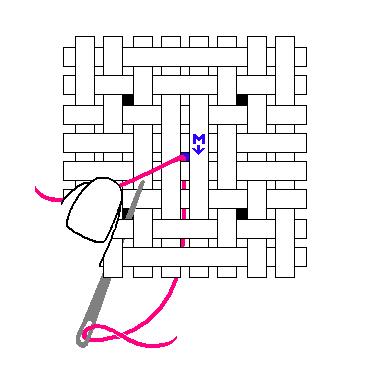 Step 2: Hold onto about a 1/2 inch of the floss end. Bring your needle up, back to front, in the first corner of your cross stitch. You can start yours in whichever corner you wish.
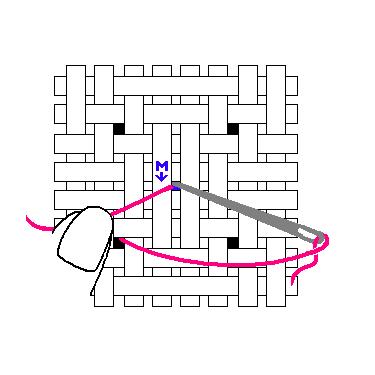 Step 3: Thread your needle back down through the middle hole again, front to back.
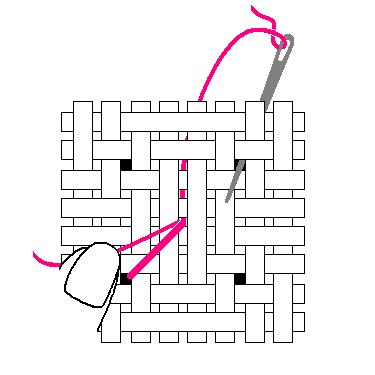 Step 4: Bring your needle up in the opposite corner diagonally, back to front.
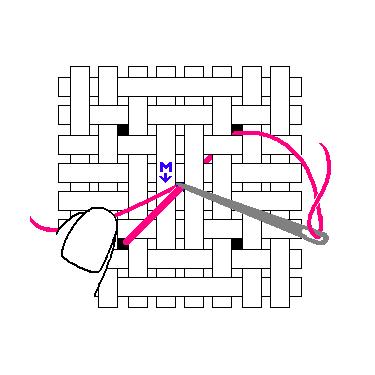 Step 5: Manuever your needle back down through the middle hole again, front to back.
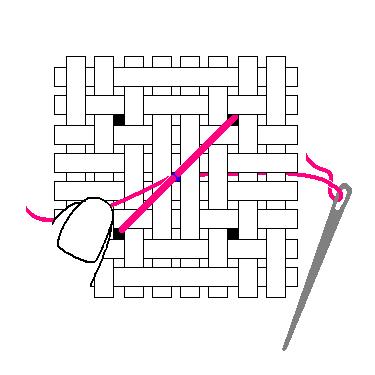 NOTE: These two "half" cross stitches make up the first diagonal of your cross stitch.
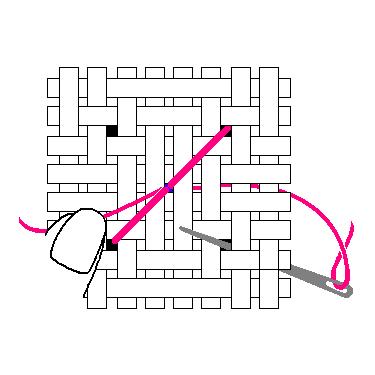 Step 6: Make the final diagonal by bringing your needle up in the appropriate corner, back to front.
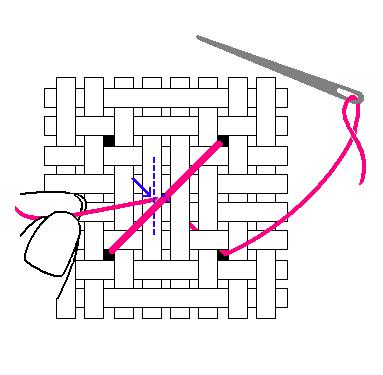 Step 7: Pull the tail of the floss that you have been holding taut, and carefully clip it close to the fabric (as shown by the blue arrow).
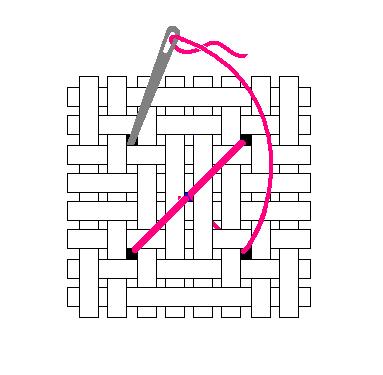 Step 8: Bring the needle down to complete the final diagonal of your cross stitch. Notice that this strand disguises the two half diagonals underneath.
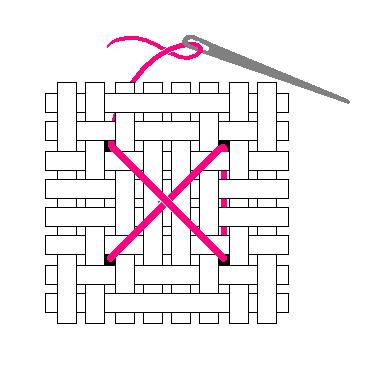 Your Pin Stitch AND Cross Stitch are complete!
Can I do this on linen or other evenweave?
Understanding what makes this stitch so secure will help you adapt it to other fabrics. The floss starts on the top of the fabric, goes to the bottom, back up to the top, and then repeats. With each of these passes, the floss changes direction to create a Figure 8. It's almost like tying a knot in your floss, with a bit of fabric in between.
 Anatomy of a Pin Stitch
The straight version can be used on linen, or any evenweave cross stitch fabric, as long as you are stitching over two threads. However, the appearance will be different. With Aida cloth, the strands disappear down in between the threads of the cloth. With these other fabrics, the strands will lay on top.
For this reason, the angled method might be a better choice. Work through both Pin Stitch Tutorials to determine which technique is best in your current circumstances.
What about an ending Pin Stitch?
There are two situations when you might use an "ending" Pin Stitch:
- Sometimes you have a pattern that has single cross stitches here and there, surrounded by stitches in other colors (instead of blank fabric). If you don't want to bury the thread in the traditional fashion, you can move a couple of squares over, and end with a Straight Pin Stitch (Steps 1 through 7) in a square that will eventually be covered in cross stitches of another color.
- The other situation is when you want to end your cross stitch with a Pin Stitch in the same square. In this case, you make a Straight Pin Stitch, but you have to work underneath the diagonal threads of an already-completed cross stitch. It can be tedious, and just not possible in every situation.
I am not a fan of doing two Pin Stitches--one to start and one to end--both in the same square. I've tried it, and I've seen other examples of it. In many cases, it makes the cross stitch obviously thicker than the others.
So if you are working with a lot of confetti stitches, try these options:
- If stitching with an even number of strands, begin with a loop start (click here for the Loop Start Tutorial) and either end with a Pin Stitch or bury the ends.
- If stitching with an odd number of strands, begin with a Pin Stitch, and bury the ends.
Contrary to popular belief, it IS possible to bury your floss ends under a single cross stitch. The trick is to weave the floss ends back and forth, over and under the back of the existing stitches, alternately. If you simply slide the floss under all of the threads, it can just as easily slide back out again.
Below are diagrams of how to bury the ends when working with a single cross stitch. I've done it many, many times and find it to be very secure. The one disadvantage is for stitchers who work on frames that make it difficult to access the back of the fabric.
How to bury threads with a confetti stitch
As shown in the Straight Pin Stitch Tutorial, you completed a vertical Pin Stitch and a full cross stitch over the top.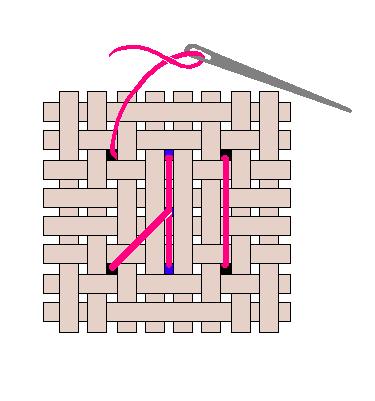 If you could see through the fabric, the back of your stitches would look like this.
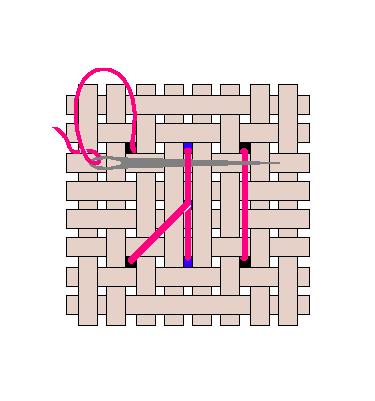 Step 1: Slide your needle under the first thread you encounter, then over the second.
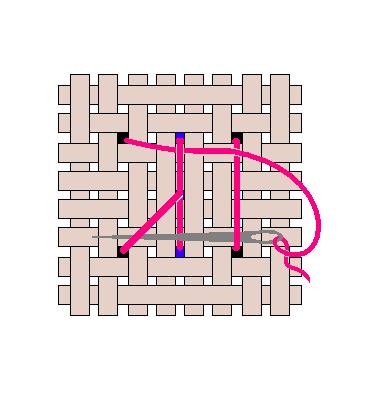 Step 2: When you turn your needle around, slide it underneath the same thread, over the next, and under the last.
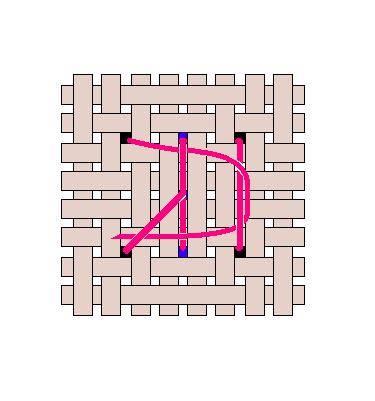 Step 3: Clip the end of your floss a bit past the last thread it went under. If you cut it too short, it could work out from under that last diagonal thread.
When burying your floss ends like this, always go underneath the first thread you encounter. No matter how many other threads you weave under and over, be sure that your final pass, before clipping, also goes underneath a thread.
You can put a drop of Fray Block on the tip of the cut floss.
If you want it to be extra, extra secure, you can turn the needle back again, go over the diagonal you just went under. Then go underneath the lower vertical thread you went over before.
A big "Thank You!" to Mary Ellen for requesting these Pin Stitch Tutorials. You can find videos demonstrating the Pin Stitch. Unfortunately, the stitch is worked over such tiny threads that the needle itself often obscures your view. I hope these diagrams and written instructions make it easy for you to master these Pin Stitch Techniques. --Katherine
Blog
-
Fabric Mounts
Nov 25, 17 08:17 PM
I want to ditch my old split rail frames and stand. I have read about a new product called, Fabric Mounts. It is supposed to keep material taut and aligned -
Hoops are okay
Nov 25, 17 08:15 PM
I've tried them all . I prefer spring hoops but if my hands are weak I have a difficult time squeezing it. The tension is great if you like taut. I NEVER -
Why a hoop????
Nov 25, 17 08:14 PM
I have never used a hoop and have been cross-stitching for 15 years - only because I didn't think it appropriate. Suddenly I came across this article and -
Don't settle for "almost"
Apr 08, 17 01:16 AM
What do you do when you can't find the perfect cross stitch chart? It happens more than you'd think.
Even though we're no longer limited to the patterns we can find in magazines or at the local craft…