Free Cross Stitch Alphabet 11
"Outline"

This outline alphabet seem to have "weight" by roping off some space rather than filling it with color. It will work well where the letters need to fill an area but you don't want to overpower the surrounding design elements.
Of course, if you like the letters but want them filled in, you can certainly do that, too.
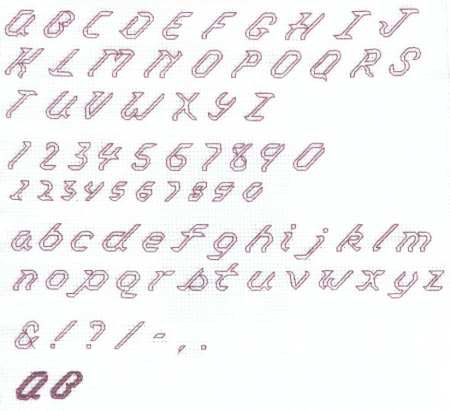
Alphabet 11
Click here to enlarge
Click here or on the picture above for a printable PDF pattern for Alphabet 11. A new window (or tab) will open so you can keep your place here.
Stitch details for Outline Alphabet
The Outline Alphabet, as shown in the photograph, is stitched on 14-count Aida using DMC floss. It was originally designed to be stitched in outline, using backstitches alone. However, it can also be filled in with cross stitches. You can see an example in the letters "A" and "B" stitched at the bottom of the chart..
Outline only:
- 1 strand for backstitches
Filled in:
- 2 strands for cross stitches and partial stitches
- 1 strand for backstitches
Description:
- Outline Letters, script/italics
Characters Included:
- Upper Case Letters
- Lower Case Letters
- Numbers
- Punctuation
Height:
- The upper case letters are 7 stitches high
- The lower case letters without ascenders or descenders (ex: a, c, o) are 5 stitches high
- The lower case "j", including the descender and the dot above it is 9 stitches high
Width:
- The majority of the upper case letters are 8 stitches wide
- The majority of lower case letters are 6 and 7 stitches wide
Stitch Complexity
For outline only:
- Backstitches alone complete the outline form of these letters
For solid letters:
Because they are thin and slanted, the majority of stitches used to fill in these letters will be partial stitches. You can choose whether to use 1/4 cross stitches or 3/4 cross stitches.
For a 1/4 cross stitch, the backstitch outline completes the diagonal side, and will result in thinner, more angular letters. The 3/4 cross stitch includes the diagonal side, and your letters will look fuller and rounder. The fabric and floss strand count may affect your choice.
If you are uncertain which to use, try stitching a few sample letters in the corner of your fabric.
Learn any unfamiliar stitches by clicking on the "How To..." button on the left menu or the Better Cross Stitch Patterns Home page.
Floss
Feel free to change the floss color to reflect your tastes and to coordinate with the rest of your project. Use the same number of strands that you are already using throughout the rest of your cross stitch pattern.
How to Fit Text into a Design
These letters are thin and slanted, making it easy to "nest" them. If space is at a premium, you can easily place them with merely a stitch between. There are other tips and tricks to selecting and adapting cross stitch alphabets. See Alphabet 123's on the menu on the left.
Return to the top of this page
Return from Cross Stitch Outline Alphabet Pattern to Free Cross Stitch Alphabet Patterns
Return from Cross Stitch Alphabet Pattern to Better Cross Stitch Patterns Home Page
Blog
-
Fabric Mounts
Nov 25, 17 08:17 PM
I want to ditch my old split rail frames and stand. I have read about a new product called, Fabric Mounts. It is supposed to keep material taut and aligned -
Hoops are okay
Nov 25, 17 08:15 PM
I've tried them all . I prefer spring hoops but if my hands are weak I have a difficult time squeezing it. The tension is great if you like taut. I NEVER -
Why a hoop????
Nov 25, 17 08:14 PM
I have never used a hoop and have been cross-stitching for 15 years - only because I didn't think it appropriate. Suddenly I came across this article and -
Don't settle for "almost"
Apr 08, 17 01:16 AM
What do you do when you can't find the perfect cross stitch chart? It happens more than you'd think.
Even though we're no longer limited to the patterns we can find in magazines or at the local craft…