How to Make Fringe
for Cross Stitch
These easy instructions show how to make fringe for cross stitch designs for pillows, bookmarks, ornaments and many other projects. Done in moderation and with an exacting hand, fringe can provide that "something extra" needed to finish off a special gift or keepsake.
You may also want to add floss accents to your fringe. If you decide to add floss accents, proceed in this order:
- Complete the stitching for both sides.
- Complete the steps for adding accents using the link immediately above (It may seem like a big task, but if you just take it step by step, it's easy!)
- Skip down to Now for the Fringe below to finish it
If you will not be adding floss accents, continue here:
Before you can learn how to make fringe, you must have a "finished" edge to work with. Otherwise, the fringe can just "keep going" right through the cross stitch itself. To learn more about how to finish off the edges, see How to Join Sides.
The instructions on that page can be used to finish edges for a single cross stitch or for one with two sides that must be joined.
Finishing edges: the short course
I prefer to secure the edges of a cross stitch using floss rather than thread and sewing machine.
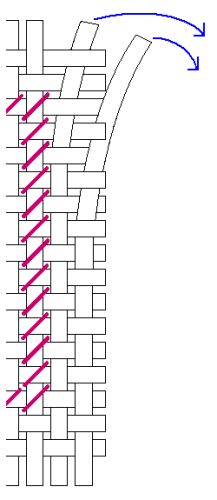
- Start by bringing your needle up through the fabric at one of the corners of the cross stitch, marked here with a 1.
- Push the needle down through the hole at 2, completing a half stitch.
- Bring the needle up again at 3 to begin another half stitch. Note that red lines indicate the way stitches would appear on the front, or "right" side of the fabric. Blue lines show where the stitches would appear if you could see through the fabric, x-ray vision at it's finest!
- From there, use half stitches to finish off the entire outside of the project as shown in the detail drawing.

Now for the Fringe!
Following these steps, you will learn how to make fringe in no time!
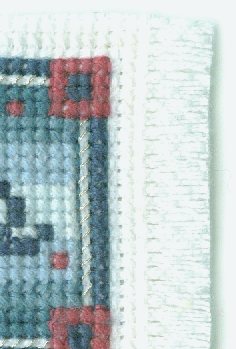
 Gently Tease Threads From the Edge
- Trim the sides of your fabric to the desired fringe length. It is easier to accurately cut straight before beginning, but if you are uncertain, leave the trimming until later.
- Use a needle to tease out the horizontal rows of thread. Start at the corner, working one or more threads loose, and gently pull them away from the side and out altogether.
- Sometimes you can easily remove several strands at a time. Other times, you may need to do them one at a time. Work carefully--it would be a shame to damage the project so near the finish.
- Continue around the edges until all sides are fringed.
Run a line of Fray Block at the base of the fringe to prevent further raveling. See How to Join Sides for more detail on how to finish off edges, whether working with one- or two-sided projects.
Variations on a Theme: How to make Fringe with Attitude!
Sometimes your design calls for something a little different. Our "Freedom Isn't Free" bookmark is a good example of that, where the theme of a proudly waving flag is carried beyond the stitched image.
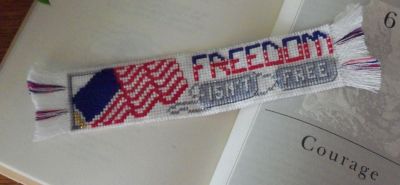
Note how the curve of the fringe mimics the wave of the flag. Your design may call for a zig zag, perhaps next to some lightning on a Halloween bookmark. Whatever the design, simply improvise a shape.
Try it! If you do not like the results, a quick snip of the scissors restores the straight edge. You might want to wait a couple of days and view it with a fresh eye.
Step 1: Decide how long you would like to make your fringe. Starting a few stitches farther out, use a pencil to draw your desired shape directly on the fabric.
Step 2: Slightly inside the line you drew, carefully cut the fabric using the shape of your pencil line as a guide. (You will be discarding the end with the pencil mark).

Step 3. The remaining rows make up the fringe. Now skip back up to Step 2 in the section, Now for the Fringe to see how to finish this process in detail.
Now that you know how to make fringe, go make some!
Home › How to Cross Stitch › Make Fringe
Blog
-
Fabric Mounts
Nov 25, 17 08:17 PM
I want to ditch my old split rail frames and stand. I have read about a new product called, Fabric Mounts. It is supposed to keep material taut and aligned -
Hoops are okay
Nov 25, 17 08:15 PM
I've tried them all . I prefer spring hoops but if my hands are weak I have a difficult time squeezing it. The tension is great if you like taut. I NEVER -
Why a hoop????
Nov 25, 17 08:14 PM
I have never used a hoop and have been cross-stitching for 15 years - only because I didn't think it appropriate. Suddenly I came across this article and -
Don't settle for "almost"
Apr 08, 17 01:16 AM
What do you do when you can't find the perfect cross stitch chart? It happens more than you'd think.
Even though we're no longer limited to the patterns we can find in magazines or at the local craft…