Separating Floss
|
If you've been separating floss by pulling the strands apart, you've probably also spent time taking knots out of your tangled floss. Check out the diagrams and short video below. You'll be amazed at how easy it really is, when you do it the right way. |
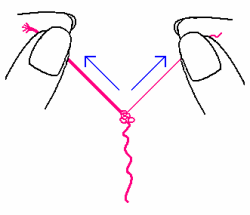 The WRONG way to separate floss. The WRONG way to separate floss. |
Every one of dozens of cross stitch magazines on my shelf contains a small group of diagrams explaining the most basic steps to use for each project. I always breezed right past these instructions. After all, I was "experienced."
So I continued (we're talking years) to separate my floss the wrong way, with one noticeable difference. I held the dangling end of the floss between my lips. I am not making this up! I routinely had to cut knots out of my floss. Was my face red when I discovered the error of my ways!
Why separate strands just to recombine them?
Most cross stitchers use standard six strand cotton embroidery floss from manufacturers like DMC, Anchor or JPCoats. But seldom do you use all six strands at the same time.
Your cross stitch chart instructions should tell you how many strands to use for a particular stitch. It may seem like extra work to separate, for example, two individual strands from the group, then recombine them to begin stitching. But you will be much happier with the results, if you do.
Because the six individual strands have been "packed" together and wound into a skein, there is a natural twist to the floss. By pulling those strands apart, then recombining the number of strands you need, the floss is "fluffed," and your stitches will be fuller and thicker.
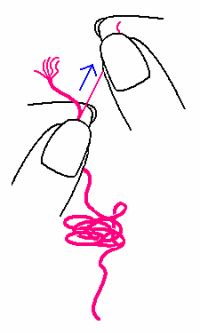
Separating floss the right way
|
 |
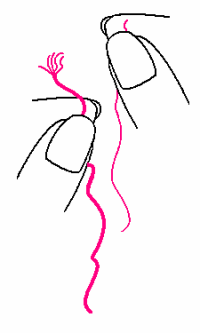 |
Looks can be deceiving. When you pull that single strand away, the bunched-up piece (even though it appears to be a mess) straightens easily. I've seen magic tricks that were less impressive!
Continue until you have the number of strands you need, then lay them back together to begin stitching.
See separating floss in action!
You might encounter a cross stitch chart that doesn't tell you how many strands to use for each stitch. Or, your chart includes this information, but you decide to use a different fabric count than in your pattern. Click here to check out our page on floss coverage, and why it matters.
Now try both methods of separating floss. You won't believe the difference!
Home › How to Cross Stitch › Separating Floss
Blog
-
Fabric Mounts
Nov 25, 17 08:17 PM
I want to ditch my old split rail frames and stand. I have read about a new product called, Fabric Mounts. It is supposed to keep material taut and aligned -
Hoops are okay
Nov 25, 17 08:15 PM
I've tried them all . I prefer spring hoops but if my hands are weak I have a difficult time squeezing it. The tension is great if you like taut. I NEVER -
Why a hoop????
Nov 25, 17 08:14 PM
I have never used a hoop and have been cross-stitching for 15 years - only because I didn't think it appropriate. Suddenly I came across this article and -
Don't settle for "almost"
Apr 08, 17 01:16 AM
What do you do when you can't find the perfect cross stitch chart? It happens more than you'd think.
Even though we're no longer limited to the patterns we can find in magazines or at the local craft…