How to Join Sides of a
Cross Stitch Design
You've just finished the front and the back of your bookmark, greeting card, ornament, mobile, flyswatter, what-have-you, and a tickle begins in the back of your neck.
How to I join these two sides? There's an obvious way (that I call "the hard way") and another way. I'll show you the easy way, below.
Click here if you prefer a straight, clean finished edge without fringe.
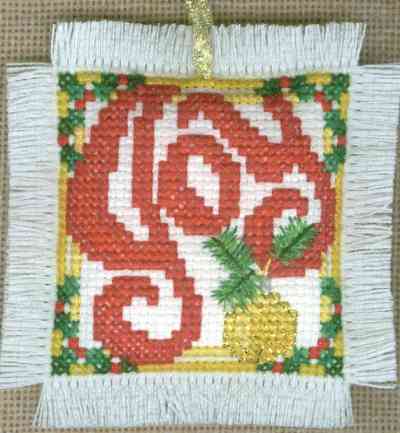
They look so good sitting there, don't they. Finished. Pristine. You just wish there was some way to explain to Aunt Millie that the two bookmark sides really do look better separate. Two instead of one, see?! But you know she won't buy it. She'll smile and all, but you just won't feel quite right.
So! Got to join those sides and fill your cross stitch maven-ly duty. Here's how. And you'll love how it looks.
Remember that hard way I mentioned? Some would call it the easy way. You just rev up your sewing machine and run a thread around the item in the traditional way. Quick. Fast.
Conventional.
It also takes me out of my favorite chair, forces me to get out my sewing machine and fuss with it, for what? Half a minute of sewing.
Not only that, but I have spent minutes (maybe hours) making every stitch just so, with my very own fingers, using floss! Why should I finish it off with plain old sewing thread?
The Easy Way -- How to Join Sides of a Cross Stitch Pattern
Without Compromising Your Purist Cross Stitch Principals ;-}
Start with a floss color that matches the fabric. These stitches do not form a part of the design, they only hold the sides together. You want the stitches to "disappear" so they don't add or detract from the original cross stitch design.
Two strands of floss works well for 14-count fabric. For other thread counts, try the same number of strands called for in your pattern for cross stitches. The stitches must keep the edges from fraying where we don't want them to.
If you are uncertain how many to use, try using the instructions below on two scraps of the same fabric. Test them a little. If the stitches hold, great. If not, increase by one strand at a time until you get a secure edge.
Steps for how to join sides
 Design A, aka "front" Design A, aka "front" |
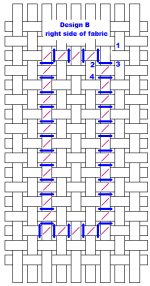 Design B, aka "back" Design B, aka "back" |
 Design A Detail Design A Detail |
 Design B Detail Design B Detail |
Examine the illustrations for a moment. You'll be joining Design A, the front, with Design B, the back. The "right" side refers to the front of the cross stitch, so both front and back of the project have a "right" side.
| For this instruction, though, let's pretend that we have x-ray vision. Instead of having to flip the illustrations over and deal with all that confusion of "left is now right" and "right is now left... See, it just confuses the matter. Let's just cut, I mean, see right through it. X-ray vision, now. Just like Superman. |
The numbers show the order of the stitches you'll be making. The dark stitches show how your "sewing" will look on each design side. The faded stitches indicate what is happening on the opposite side.
Note that the stitching begins on the row immediately next to the last row of the stitched design.
- Trim the edges of Design A and B to match.
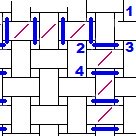
- Bury the thread on the back of Design A in the same way you normally would to begin stitching. Then, bring your threaded needle up to the right side of Design A at #1 in the drawing.
- Hold the "wrong" sides (the back of each design) together, and push the needle down at #2 on Design A and right on through to the right side of Design B. This completes the first diagonal half stitch. It goes through both pieces of fabric.
- Now bring your needle through the right side of Design B at #3, making a straight stitch on that side. But don't stop there. Come all the way through Design A. Both sides are now joined with this first stitch.
- Continue stitching this way through both pieces of fabric. The pattern on Design A will look like standard diagonal half stitches (shown above in red), while those on Design B will look like a series of parallel straight stitches (shown here in blue). After the first few stitches, it will become easier and easier to align the fabric and go through the holes on both sides.
The corners will naturally meet. If they don't, you have made an error somewhere along the way. Because your floss matches your fabric, a skipped hole is easy to miss when looking for the problem. Working backwards from where you first noticed it was not aligned, magnify and examine your stitching. When you do find the problem, remove your stitches back to that point and redo the work.
-
When you make your last stitch, thread the needle between the two sides for a couple of inches. Push the needle back out to the front of one of the sides. Pull slightly and cut. When you release the floss and flatten the fabric, the end should pull back between the two sides and disappear.
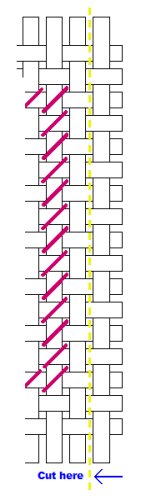 Trim the Edges
- Carefully clip the fabric edge one row away from the stitching. Then run a line or two of Fray Block on the cut edges.
Now you know everything there is to know about how to join sides of a cross stitch pattern! Unless you want to have fringe. Fringe adds a nice touch to many designs, and it isn't difficult to do. See my page on how to make fringe.
While you're at it, check out my tutorial on adding floss accents to fringe.
Home › How to Cross Stitch › How to Join Sides
Blog
-
Fabric Mounts
Nov 25, 17 08:17 PM
I want to ditch my old split rail frames and stand. I have read about a new product called, Fabric Mounts. It is supposed to keep material taut and aligned -
Hoops are okay
Nov 25, 17 08:15 PM
I've tried them all . I prefer spring hoops but if my hands are weak I have a difficult time squeezing it. The tension is great if you like taut. I NEVER -
Why a hoop????
Nov 25, 17 08:14 PM
I have never used a hoop and have been cross-stitching for 15 years - only because I didn't think it appropriate. Suddenly I came across this article and -
Don't settle for "almost"
Apr 08, 17 01:16 AM
What do you do when you can't find the perfect cross stitch chart? It happens more than you'd think.
Even though we're no longer limited to the patterns we can find in magazines or at the local craft…