Preparing Fabric for
Cross Stitch
You can easily reduce cross stitch mistakes by preparing fabric before you start. When a single misplaced stitch can mean ripped out stitches, wasted floss, damaged fabric, and most importantly, wasted time, this is one step you don't want to skip.
I often remember that old
saying, "For every minute spent preparing, you will save an hour." I
don't doubt that for a moment, and it certainly applies here.
Preparing fabric for cross stitch involves three easy steps:
- Finding the center
- Securing the edges
- Basting in grid lines
But don't mistake easy for unimportant. You'll be done in no time, and you'll reap the rewards through your entire cross stitch project.
Step 1: Finding the Center
Most pattern instructions ask you to find the center of the fabric in order to center the design. If you are using a kit that contains the precut fabric, you can skip to Step 1 of the diagrams below.
If you are using other fabric, you must cut your fabric to the right size. To do that
- find the maximum number of stitches the design uses vertically and horizontally (your pattern instructions often tell you these numbers
- convert that stitch count to inches by dividing it by the fabric count
that calculation is: maximum stitch count divided by fabric count = inches
example: your design 44 at it's widest point, then 44 stitches wide ÷ 11 count fabric equals 4 inches
or you can use our handy stitch count table - decide how you will display the finished cross stitch
- add enough
inches to both the length and width and cut
It is always better to trim off excess fabric once you are done cross stitching than it is to finish embroidering, only to find that you didn't allow enough room around the edges to complete and display your project.
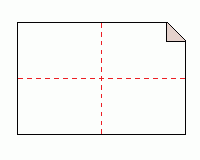 1. Cut the fabric to size.
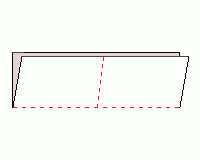 2. Fold in half, aligning the edges
 3. Fold in half again, aligning the edges. Insert a pin into the center point.
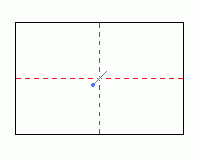 4. Unfold the fabric...
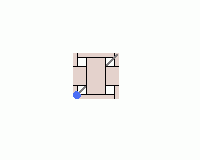 5. ...placing the pin into the center square.
Step 2: Securing the Edges
The next step in preparing fabric for cross stitch can be done in one of three methods. However, I found out the hard way that one of them is vastly superior to the others.
Method 1: Tape the Edges
Years ago, this was the way we kept the edges from fraying. You folded masking tape over the edges, then removed it when you were finished.
The problem is that the tape leaves behind an adhesive residue, often invisible. That slight stickiness attracts dirt and results in soiled fabric, so use it only if you plan to cut off the edges.
Because of this, I don't recommend this method for preparing fabric edges, but wanted to include it because you may see it elsewhere or might have learned this way.
 1. Fold tape around the edges
Method 2: Zig-Zag the Edges
Using your sewing machine set to a zig-zag stitch, sew closely along the
edges of your fabric. This prevents fraying, but involves two things I
don't like
- leaving my favorite cross stitching chair for something I can do right where I am
- with stiffer cloths like Aida, my floss gets caught on the pointy edges while stitching (check out the close-up below)
Other types of fabric might not react like this. Even so, I used this method over and over again, until I discovered the beauty of Fray Block, described in Method 3.
 2. Use a sewing machine to zig-zag the outside egdes
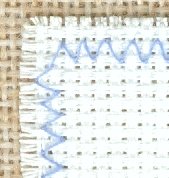
When I zig-zagged the edges of my cloth, it separated the individual threads of the Aida, and transformed them into stiff, protruding little spikes. I became more and more frustrated as my floss would repeatedly "catch" on the edges of my fabric.
Method 3: Apply Fray Block
I can't sing enough praises for this product. Fray Block
- works
- is inexpensive
- is easy to use
- acts as glue to help keep floss ends secure
If you've never used it before, you might be surprised that Fray Block has the consistency of water. To apply it, hold your fabric vertically, with a light behind it. Starting at the top corner, place the tip on the fabric edge and if necessary, squeeze very lightly. Often, gravity will do most of the work. Run it along all the edges - with a light behind it, the fabric will look and feel wet.
 3. Apply Fray Block around the edges
Step 3: Stitching in Grid Lines
Stitching grid lines in your fabric to match the bold lines on your cross stitch chart is a necessary step for keeping your sanity. Every time I talk myself out of this important step, I regret it. So does everyone around me.
Preparing fabric by stitching grid lines gives you two different points to count from when you are determining the location of your next stitch. You not only count in relationship to another existing stitch, but also in relationship to a bold line on your cross stitch chart. It fulfills the carpenter's mandate, "measure twice, cut once," but in our case, we "count twice, stitch once."
Remember in school when you added 4 + 5 = 9; you could check your answer by subtracting 9 - 5 = 4. It's similar in counted cross stitch. You see on your chart that a cross stitch in #321 red starts two squares away from #900 green stitch you just finished. With grid lines in your fabric that match the grid lines on your chart, you also see that the same #321 is also seven squares from a grid line. If you've counted from two different points and ended up in the same square, you know you are in the right place.
Complete this next easy step preparing fabric,
and a good portion of your counting will be done ahead of time!
Here's how you do it. First complete Steps 1 and 2 described above. You will only need to stitch grid lines either horizontally or vertically. Each long stitch will go in and out of the fabric every ten squares, matching where the perpendicular bold lines intersect on your chart.
Step 1. Select a contrasting floss color not included in the pattern you'll be stitching. Avoid the darkest colors, however, as the floss can leave a stain on light fabrics over time.
Step 2. From the center, find the closest point where a horizontal gridline intersects a vertical line. Along that line and to the edges of the fabric, mark every ten squares with a pin. When you are done, you will have a single line of pins, each one at the point on your chart where the vertical and horizontal bold lines intersect.
(You don't have place pins for every bold line on the
entire chart, because once you have a single line stitched correctly, you can use
that as a reference point for stitching your other lines).
Step 3. Using a single thread for each line; knot the thread. Stitch the entire length of your pattern. At the end of that line, knot or secure the thread and cut.
 Stitching grid lines is the most important step in preparing fabric for cross stitch.
Again, envision these lines as long running stitches that go in and out of the fabric every ten squares.
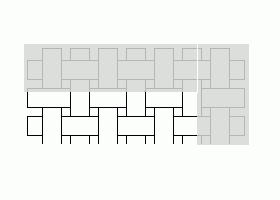
Step 4. Repeat the process for every bold line in the
pattern. If you start stitching a line from the front of the fabric, start in the back for the next line, as shown in the diagram (in other words, if your thread goes front to back to front, the next line should be stitched back to front to back, and so on).
Frequently count the lengths of your stitches to be
certain you are still marking exactly ten squares. By carefully preparing fabric with accurate grid lines, you can confidently depend on
them for counting throughout the rest of your cross stitch project.
You will be snipping the grid lines out of your way as the cross stitches overtake them. At first, I used one very long strand of floss and carried it from row to row. But as I cut and pulled out sections along the way, the remaining threads in other rows would slip out before I wanted them to. Now each row has it's own thread.
Of all the steps used in preparing fabric for cross stitch, using grid lines ranks as the most important. It will save much more time than it takes to implement. If you haven't tried it before, you'll see an immediate difference in your productivity, and you will enjoy cross stitch even more.
Home › Free Cross Stitch Charts › Preparing Fabric
Blog
-
Fabric Mounts
Nov 25, 17 08:17 PM
I want to ditch my old split rail frames and stand. I have read about a new product called, Fabric Mounts. It is supposed to keep material taut and aligned -
Hoops are okay
Nov 25, 17 08:15 PM
I've tried them all . I prefer spring hoops but if my hands are weak I have a difficult time squeezing it. The tension is great if you like taut. I NEVER -
Why a hoop????
Nov 25, 17 08:14 PM
I have never used a hoop and have been cross-stitching for 15 years - only because I didn't think it appropriate. Suddenly I came across this article and -
Don't settle for "almost"
Apr 08, 17 01:16 AM
What do you do when you can't find the perfect cross stitch chart? It happens more than you'd think.
Even though we're no longer limited to the patterns we can find in magazines or at the local craft…