How to "Bury the Thread"
"Now just bury the thread," Mom said.
I had just completed a row of cross stitch and needed to change colors. But I knew if I just clipped the end, the floss would unravel, sooner rather than later.
This has probably happened to you. Or it will.
You could tie a knot easy enough, but just imagine all the knots you'll tie by the time you finish your project. Then imagine the effect of all those knots on your finished piece.
Bumps! When you get ready to display your cross stitch, especially if it's in a frame, you will see dozens, perhaps hundreds of bumps!
To avoid that problem, just use an old stitcher's trick called "burying the thread."
When Mom first showed me how to embroider, she coached me through the first few stitches and then showed me the standard stitcher's method for securing floss.
- For projects in which the back of the piece will not be covered, such as afghans, blankets, dishcloths and towels, you will want them to be even more tidy than usual. For these items, bury the thread as shown in the second set of diagrams, know as the vertical method.
- For other works, the horizontal method, shown immediately below, can be used.
The horizonal method to bury the thread
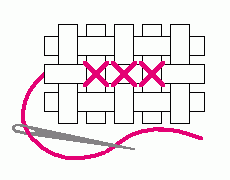
You've just finished a row of a certain color. Now what?
 |
 |
|
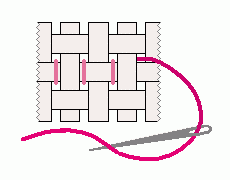
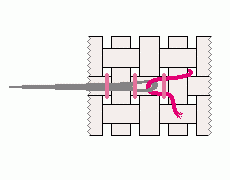
1. Turn it over and it looks like this. |
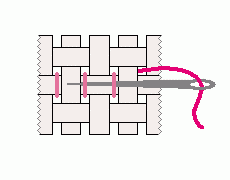
2. Run the threaded needle horizontally beneath the vertical threads... |
 |
 |
|
3. ...continuing until you have passed the thread under at least 4 threads for decorative work, 6 or more if it will be laundered. |
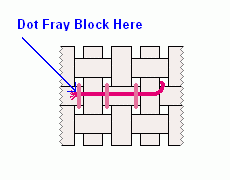
4. Using curved embroidery scissors, clip the thread close to the fabric. As an added precaution, place a tiny drop of fray block where the floss last crosses a vertical stitch. |
Pass the thread beneath 4 or more threads for work that will be on display. If it will be laundered, pass it under 6 or more.
The vertical method
If your project will not be hidden, or if you just want a tidier back, use the vertical method below.
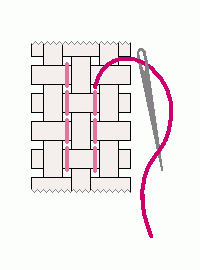
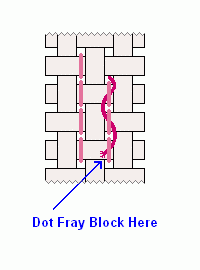
In this method, instead of burying the thread under a horizontal row, follow the vertical lines. This makes for a tidy appearance when the back of your stitching will show. Simply weave your needle left and right under each succeeding row. When finished stitches will look like elongated S's.
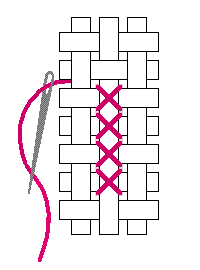
Here is a finished vertical row.
 |
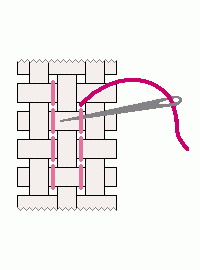 |
|
1. When you finish stitching with one color, turn the fabric over. |
2. Weave your threaded needle beneath the previous stitch... |
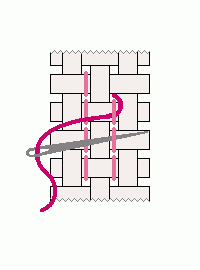 |
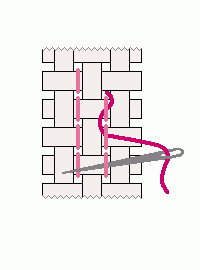 |
|
3. ...then in the opposite direction... |
4. ...and the next... |
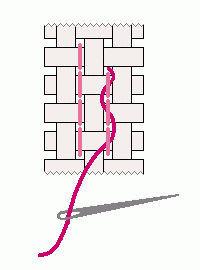 |
 |
|
5. ...until you have passed beneath at least 4 threads, 6 if your project will be laundered. |
6. Using curved embroidery scissors, clip the floss close to the fabric. As an added protection against raveling, place a drop of fray block where the floss last crosses a stitch. |
Burying the thread is one of the most common actions in cross stitch. It allows you to avoid lumps and bumps in your final project without having floss unravel. That would not be pretty.
Sometimes you will need to place a single cross stitch in an area by itself, not touching other colors. Known as a "confetti stitch," it requires a little different technique for securing the thread, called the loop start.
If you have a comment or question about this lesson, or if you would like to suggest a new one, please go to our Contact Us page. (We promise not to use your email address for any other purpose.)
Home › How to Cross Stitch › How to Bury the Thread
