How to Cross Stitch the
Most Basic Stitch Type
Making a single cross stitch seems to be the simplest of tasks, but like doing anything the first time, you can still make mistakes. Luckily, though, after doing a couple of these, you will have mastered it.
The lessons that follow this one will show you how to make rows. You might think you could just make one after another in succession, but other methods make for speedier, easier work. For now, though, just follow these steps to see how one is made.
In the illustrations, an up-arrow represents bringing your needle from the back, or "wrong" side, of the fabric up through to the top, or "right" side. A down-arrow means to push your needle from the top of the fabric down through to the back.
The fabric details are enlarged to simplify understanding.
How to make a cross stitch
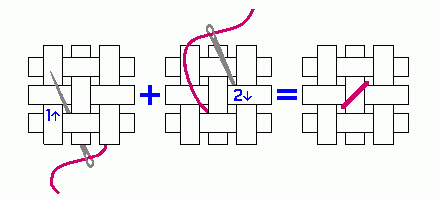
Steps 1 and 2 form the first diagonal stitch.
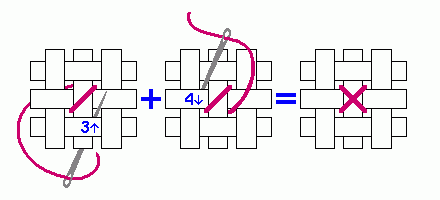
The remaining steps form the diagonal cross and complete the stitch.
If you thought that was easy, you're right! To see how this differs from what you'll actually do when working a pattern, see my tutorials on how to complete a row by and the sewing method.
Of course, there are many other forms, such as french knots, daisy, and back stitches, as well as techniques for burying the thread and using a waste knot. Using our illustrated tutorials and videos, you'll master them in no time at all!
If you have a comment or question about this lesson, or if you would like to suggest a new one, please go to our Contact Us page. (We promise not to use your email address for any other purpose.)
Home › How to Cross Stitch › How to Cross Stitch
Blog
-
Fabric Mounts
Nov 25, 17 08:17 PM
I want to ditch my old split rail frames and stand. I have read about a new product called, Fabric Mounts. It is supposed to keep material taut and aligned -
Hoops are okay
Nov 25, 17 08:15 PM
I've tried them all . I prefer spring hoops but if my hands are weak I have a difficult time squeezing it. The tension is great if you like taut. I NEVER -
Why a hoop????
Nov 25, 17 08:14 PM
I have never used a hoop and have been cross-stitching for 15 years - only because I didn't think it appropriate. Suddenly I came across this article and -
Don't settle for "almost"
Apr 08, 17 01:16 AM
What do you do when you can't find the perfect cross stitch chart? It happens more than you'd think.
Even though we're no longer limited to the patterns we can find in magazines or at the local craft…